
The bowtie depicts scenarios in a time ordered sequence moving from left to right.
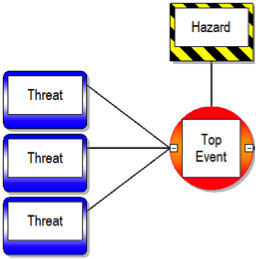
- The hazard and top event are at the centre of the diagram.
- Threats are placed to the left of the top event.
They describe events that may cause an unsafe state if not managed with preventative controls.
Consider the top event and ask the question ‘why’ or ‘how’ could this occur. These causes are the threats and need to be ‘direct’. There should be a logical cause and effect relationship between the threat and the top event. The reader should be able to understand this relationship based on the threat description.
In our example of driving a car on a busy UK motorway, a threat would be tyre blow out.
Definition
A possible direct cause that will potentially release a hazard by producing a top event.
Guiding principles
- It is usually helpful to describe the ‘cause’ as a particular event (e.g. something that occurs), which sets off the subsequent scenario that leads to the top event (and therefore the potential consequences).
- Threats should be plausible. The overall effectiveness of the bowtie will be enhanced by concentrating on threats that are considered plausible rather than overwhelming the diagram with extraneous possibilities.
- Each threat should be capable of causing the top event independently (e.g. it should not be necessary for several threats to occur simultaneously).
- In terms of ordering the threats (e.g. position top to bottom in the bowtie), there is no particular significance to placement however the convention is to place the most significant threat at the top.
Traps and tips
- Trap: A very common mistake is to describe a control failure as a threat. For example, describing a ‘failure to stop at a holding point stop bar light’ as the threat in a runway incursion scenario. In this case, the stop bar lighting would be a control that helps prevent an incursion in the first place. The failure of this control does not cause a runway incursion, rather it allows the dangerous scenario to progress further towards the undesirable outcome.
- Tip: Take time to revisit the threat descriptions before moving onto further development of the bowtie.
- Ask the question: “would this threat actually cause the top event?” or “what is the actual cause?”
- Taking the example of ‘failure to stop at a holding point stop bar light’ a causal factor could be ‘flight crew failed to follow clearance’.
- Tip: Take time to revisit the threat descriptions before moving onto further development of the bowtie.
Provide feedback for this page
News from UK Civil Aviation Authority
- Experts appointed by regulator to strengthen economic regulation and support growth
- UK Civil Aviation Authority and Ministry of Defence join forces to build pathway into civil aviation for military personnel
- Regulator’s accessibility assistance report highlights progress made by most UK airports but finds three airports need improvement